403 Forbidden
ERR_WEB_NGX_403

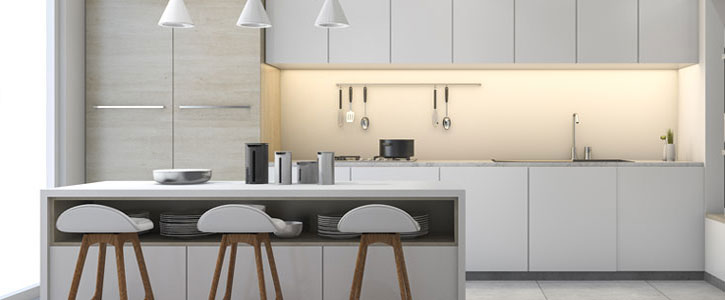
The kitchen is the heart of the home. It's where meals are prepared, conversations are held, and memories are made.
But what if your kitchen lacks the right lighting? It can affect both the functionality and ambiance of the space. Enter kitchen downlighting. This technique can transform your kitchen, making it not only more practical but also more inviting.
In this guide, we'll explore how to enhance your kitchen with downlighting techniques. From choosing the right downlights to installation tips, we've got you covered. Let's illuminate your kitchen in style.

Kitchen lighting is more than mere illumination. It impacts how you use and feel about your space. A well-lit kitchen enhances visibility, making cooking safer and more efficient.
Moreover, it influences the overall atmosphere. Soft, layered lights can create a welcoming environment. Beyond functionality, proper lighting elevates your kitchen's design.
Balanced lighting highlights features like backsplashes and countertops. It can enhance colors and create depth. Without the right lighting, even the most stylish kitchens can appear dull or overly bright.
Adopting versatile lighting solutions allows flexibility. Adjustments for different activities, from cooking to dining, are key for a lively space.
Kitchen downlighting focuses light directly downwards. This creates a bright, concentrated effect, perfect for task lighting. It's commonly used over countertops and islands.
Using kitchen downlights can significantly enhance both functionality and aesthetics. They ensure ample light for cooking tasks and they add a modern touch to your decor.
Downlights come in various styles and sizes. From compact fixtures to larger, adjustable models. It's crucial to pick ones that fit your needs.
Selecting the appropriate beam angle is essential. It affects light spread and coverage. A well-chosen downlight improves your kitchen's ambiance and efficiency.
Choosing downlights involves understanding your kitchen's needs. The right fixture enhances both style and function. Consider practical aspects like size and placement. If you've already got downlights that need upgrading, you should measure the existing hole sizes and choose some that fit.
Energy efficiency and lifespan are crucial factors. LED downlights provide cost and energy savings. They're an investment in both your space and the environment. LED downlights are available in two different types: Integrated and GU10. Integrated LED downlights such as the JCC V50 come as one unit, the LED is built into the fitting and isn't usually replaceable. While GU10 downlights such as the Integral EvoFire (shown below) come as two separate items, the recessed downlight housing and the GU10 LED light bulb.

It's also essential to choose the right color temperature. A warmer tone creates a cozy vibe, while cooler whites illuminate task areas with clearer and whiter form of light. The warmer tones like 2700K can make a room feel too orange looking while the cooler tones liked 4000K can make a room feel harsh and unwelcoming. Some integrated LED downlights have multiple colour temperatures in one, this can be particularly advantageous for users who aren't about which colour temperature to choose, you can flick a switch during the installation or whenever you fancy a change.
Colour temperature adjustable downlights, also known as CCT (Correlated Colour Temperature) are another advantage of opting for integrated LED downlights over GU10. If you want a colour temperature adjustable GU10 downlight you can use a smart GU10 LED lamp and change the colour temperature and colours from an App.

Another great choice of colour temperature is the Philips DimTone GU10 LED, mimicking the effects of a halogen, it dims in colour temperature from 2700K to 2200K as it dims in brightness. This creates a really warm effect that you can adjust as the evening goes from sunset to darkness.
Here's what to remember when selecting downlights:
Proper installation ensures safety and optimal performance. Plan your lighting layout before beginning. A thoughtful design prevents future hassles. A professional lighting design can be done for you using Relux lighting design software. It will provide you with a plan that shows you where to optimally place each light fixture and show you the results, ensuring you don't make any mistakes.
Ensure even spacing to avoid dark spots. Consistent illumination improves functionality and ambiance. Measure accurately to achieve the best results.
Expert tip: If your downlights are positioned 1 metre apart from each, the distance from the wall or kitchen cupboards should be half of this. This ensures that you'll get the best uniformity and an even spread of light. The spacing between each downlight does depend on other factors such as the brightness (measured in lumens) and the beam angle of the downlight. We have a dedicated article about beam which beam angle to choose.
We also recommend hiring a professional electrician for any electrical installations. This adds expertise and safety assurance. Skilled installation enhances reliability and longevity.
Kitchen under cabinet lighting is an excellent way to enhance both the functionality and aesthetics of your kitchen. By illuminating countertops, it provides focused task lighting that improves visibility for food preparation and cooking. These lights also add a touch of ambiance, creating a warm and inviting atmosphere.
Available in various styles, including LED strips, cabinet lights, and mains voltage LED strip lights, under cabinet lighting is energy-efficient and easy to install. It’s a practical solution for reducing shadows and brightening your workspace while adding a modern, stylish touch to your kitchen design. One of the key benefits of using LED tape lighting is that it can be cut down to the sizes of your kitchen cabinets which are usually different widths. You install an LED driver which powers the strip lights, converting mains voltage into low voltage, stick the self-adhesive strips into position and you've got a bright and consistent lighting array.
Expert tip: Whichever colour temperature you choose, make sure everything in the room matches or you'll have a contrasting light that won't look right. An extra warm white light in a cool white room sticks out like a sore thumb.

Dimmable downlights offer flexible lighting levels. This feature is perfect for creating mood variations. Adjust brightness for different tasks effortlessly with an LED compatible dimmer switch or lighting control system such as Lightwave.
They provide energy savings and personalised settings that can be easily adjusted throughout the day. Dimmable options cater to both bright tasks and relaxed dining. Invest in quality dimmable downlights, dimmable light bulbs and dimmable LED strip lights for durability. Their versatility is unmatched in any kitchen setting.

Combine downlighting with pendant lights for a layered effect. Pendant lights add a decorative touch and enhance the ambiance. Using three hanging pendant lights creates a neat and symmetrical effect that also looks good in the daytime when the lights are off.

Blend downlighting with ambient kitchen ceiling lights. This synergy creates a warm and inviting atmosphere, perfect for gatherings and meals.
Thoughtful downlighting transforms any kitchen into a welcoming space. It combines style and functionality with ease.
By integrating the right fixtures and techniques, your kitchen lighting enhances both mood and efficiency. Enjoy the perfect blend of form and function.


I’m interested in some of your Downlights but would like to know if you have a showroom that I can see them in real. Can you let us know.
Thank you
Yes, we have a trade counter. We're based in Rochdale, OL12 9EF. Feel free to come and visit us. We can show you our collection of downlights. We open from 8AM to 5PM Monday to Thursday and close at 4PM on Fridays. We're also on open on Saturday mornings.